Internal Page and Post Cross-Linking Best Practices
When a colleague recently asked me about best practices for linking between pages on his WordPress site, I decided to do some research to see if there was a better way to accomplish this than the built in WordPress standard HTML URL linking tool. Adding internal links throughout your website is enhances user experience, marketing, and search engine optimization (SEO). For example, you may mention a number of your company’s featured products and services on your home page for which you’ve created a separate sales or detail page for each one elsewhere within your website. It’s good practice to hyperlink each p/s on your home page to each of their corresponding individual pages, because it gives your site visitors an additional opportunity to delve deeper into your website instead of solely relying on them to use your main site navigation. Internal linking is also recognized and valued by search engine crawlers and will contribute to a more [cref website-maintenance positive ranking for your site].
The first method you could use to link to another page or post within your WordPress website is to use the included link tool in the text editor that appears when adding or editing a page or post. However, this method is best suited for external hyperlinking to other sites than your own, because if you decide to change a page or post name or move it to another location within your website, all the links referenced to it will break. Every time you rename or move a page or post you’ll have to find all the hyperlinks in your website that point to it and update them. As your website scales and grows you can easily image how difficult this would become to manage. Nevertheless, it’s useful to know how to use the link tool for external linking.
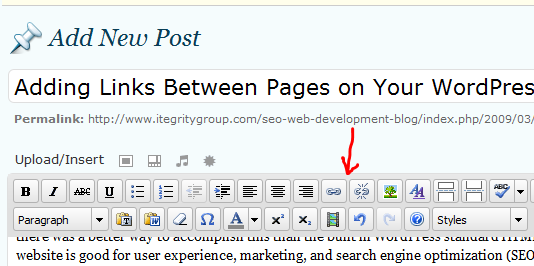
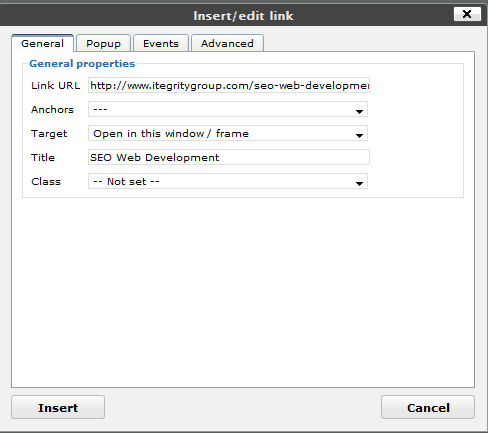
To use the link tool, first select the text you want to hyperlink by highlighting it with your cursor. The link tool (“chainlink” icon button) will then illuminate in the text editor toolbar. Clicking on the link button will open a new window with options to link your selected text.
Copy your link URL into the corresponding field and you’re ready to go. You may also choose to configure any of the other options for example, to enhance accessibility and keep visitors from closing your website in their browser when following your external links to another website (setting the Target propery to “Open in New Window (_blank)”.
Internal Linking Best Practices
A better, more dynamic method to internally link, or cross-reference your pages and posts would be to reference them by a unique ID number or Slug name. This way if you a move a page the link doesn’t change. It doesn’t matter where the page is physically located in your website, our only concern is the static unique identifier of the page.
Fortunately there is an easy way to accomplish this through the use of the Cross-references WordPress plugin. To understand how to effectively use the Cross-references plugin, you’ll need to know a little bit about how WordPress names your pages.
Each page and post in WordPress is assigned an ID number and if you were to use WordPress out of the box you’ll see it names all your pages and posts by a unique number that shows up in its URL. Remember page names and page titles are different; names are the unique name of your page in the URL, Titles are the heading you choose at the top your page or post.
Many WordPress users change the default number based naming convention in their admin settings in favor of text based permalinks, a more website visitor and search engine friendly convention. WordPress websites and blogs are database driven, that is all of your content is stored in a database and retrieved when a site visitor navigates to a certain page. Permalinks aka a permanent link, is a URL that points to a specific page or post after the content data is pulled from the database and is human readable.
When adding a new page or post, text based permalinks are then automatically created by WordPress to mirror your page or post title. The permalink for this article is: http://www.itegritygroup.com/seo-web-development-blog/index.php/2009/03/wordpress-hyperlinking-posts-pages/ . If we didn’t use permalinks, the URL for this page would look something like http://www.itegritygroup.com/seo-web-development-blog/index.php/page?id=294/ . Not very user friendly.
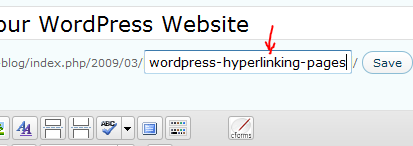
If you don’t want to name your page the same as your page title, you can edit the page name portion of your permalink in the area just below your page title. Your page name is also referred to as a Slug.
Page Naming (Permalinks)
It’s a good idea when possible to keep your page names to between one and four words separated by dashes. You can use more than four words, however search engines will weight each individual word less as you add more words. You’ll also want to strip out any words in your page name that aren’t relevant to someone searching on the internet to find your content. The default permalink for this post is my website URL + the location of my WordPress site + my page title (Slug): http://www.itegritygroup.com/seo-web-development-blog/index.php/2009/03/adding-links-between-pages-on-your-wordpress-website. There are way too many words in the page name and some that are completely irrelevant to someone who is trying to locate content about linking pages in WordPress, like “to” and “your”. I chose to name my page …wordpress-hyperlinking-post-pages because these are the keywords I’ve determined individuals are mostly likely to use when searching for my content. This unique identifier for my page wordpress-hyperlinking-post-pages is my page’s Slug.
Using the Cross-references Plugin
Once you’ve installed the Cross-references WordPress plugin (*ITegrity built websites already have the Cross-references plugin installed & configured) you’ll find the link to it’s configuration page under the Settings link in your website’s admin area.
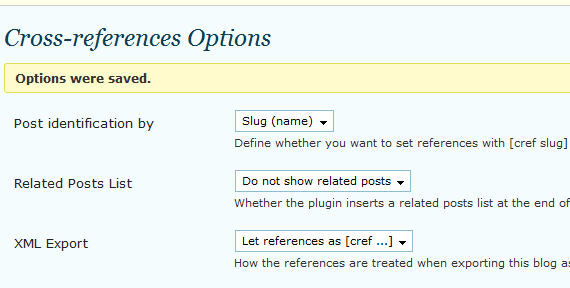
Click on the Cross-references link to open the configuration page. For most websites, you should be able to leave most of the options as is, however there are a few you may want change.

By default the “Post Identification by” is set to ID. If you are using permalinks it’s better to change the value to “Slug (name)”. Using the Slug instead of ID will save you time when you cross-link pages and posts and is a more intuitive than using an ID number.
“Related Post List” determines whether the plugin will insert a related posts list at the bottom of each page and post. This means the Cross-references plugin will list all the pages and posts you’ve linked to internally from a particular page or post. It’s a matter of personal preference as to how you set this, but I prefer to not show the related posts and pages. The other settings on the Cross-references options page usually don’t need to be changed unless you want to use the plugins more advanced features.
Now that you’ve got the Cross-references plugin configured properly, how do you actually add the links to your pages and post? Cross-references uses simple syntax for you to add your links:
[cref “slug-name”]
Example: [cref wordpress-hyperlinking-posts-pages]
Result when published: [cref wordpress-hyperlinking-posts-pages]
In the above example we used the syntax [cref followed by the Slug name of the page or post we want to link to, ending with ]. In this case the link will appear as “Adding Hyperlinks to Your WordPress Website” because that is the page title of the Slug, “wordpress-hyperlinking-posts-pages”.
What if you want to create a link to a page or post, but you want the text link to be something other than the title? In the example below, we slightly change the syntax to accomplish this:
[cref “slug-name” “text you want to be linked”]
Example: [cref wordpress-hyperlinking-posts-pages How to Cross-link Pages in WordPress]
Result when published: [cref wordpress-hyperlinking-posts-pages How to Cross-link Pages in WordPress]
All we did differently was add a space after the Slug name and then add the text for which we want to be linked, in this case, How to Cross-link Pages in WordPress. The example below shows you how the Cross-references plugin syntax is used in this article in an previous paragraph:
Changing Page Titles and Slugs and Updating Your Links
Once you start adding links to your website and blog in this manner, you may begin to wonder what happens if you decide to change one of your page titles. No problem. All of your links’ text are automatically updated whenever any of your page or post titles change. But what happens if I decide to change the Slug name of a page or post? Will it break all my links because the links are now using an old Slug name? Yes, however the Cross-references plugin provides a tool to update all of your links with one simple procedure. Remember the advanced settings at the bottom of Cross-references options page in your admin? Near the bottom is an area called Tools. The first option is
Under Tools is the function Slug Rename which enables you to update all of your Cross-references [cref] links site-wide with one mouse click. Just enter the previous name of your Slug and the new name you’ve changed it to and Cross-references will update all the links in your entire website.
Using traditional static hyperlinks to cross link pages and posts quickly becomes a nuisance as your site scales. Adding and managing internal links within your WordPress website is made into a much easier process when using the Cross-references plugin.


