Adding a new post to your WordPress website is very similar to adding a new page. The main difference between a post and a page is that a page, as the name implies, is simply a webpage on your site. A post is a blog entry, or journal entry, that appears in a specified area of your website. It can be placed on your homepage or in a different section of your website, for example under “Resources” or “News”. Posts can contain information about almost anything. They can be news stories about your business or personal diary entries about your day. You can use posts to add new articles or white papers to your site..or ones you’ve written in the past. You can also add Microsoft PowerPoint presentations and Adobe PDFs to your posts (read about how to [cref add-pdf-wordpress add PowerPoints] or [cref powerpoint-presentations-wordpress PDFs to your post or page]).
Another difference is posts can have categories and tags associated with each entry.
Categories are the general subject or topic that a post is classified within. They are useful for organizing your blog content and allowing your visitors to browse certain categories to view posts of similar subject matter. It’s good practice to keep the number of main categories under ten as to not overwhelm your site visitors with too many choices. You can also add subcategories to your main categories if needed.
Tags are similar to the Meta tags of a website page. They also give you more fine grain control over how you classify your posts. When someone searches using specific keywords, they will locate your post by not only it’s title, but the tags you’ve added to describe your post’s content. Drawing upon an analogy to scientific classification in biology, Categories can be thought of as “Class” (i.e mammals, birds, fish, reptiles, amphibians, arthropods) whereas Tags are like “Species” (i.e fox, deer, bear, desert kit fox, western mule deer, alaskan polar bear).
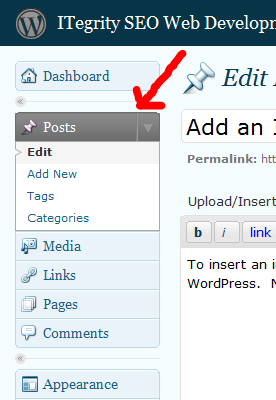
To get started adding a new post, log in to the Admin area of WordPress and click on “Posts” in the left navigation. In the expanded “Posts” area in the navigation, click on “Add New”.
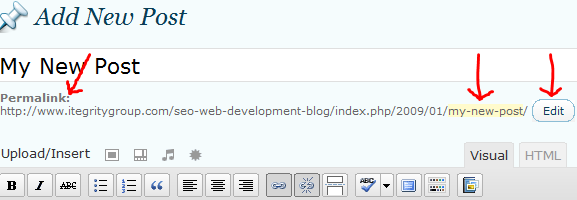
Now you’re ready to begin writing your new post for your website. The first step is to enter a post title. Once you’ve finished adding a title, click in the text editor area below the text formatting toolbar where you’ll be writing the body of your post. A new URL for your post will be dynamically created for you by WordPress, based on what you entered for your post’s title, and will appear next to “Permalink” below title text box.
Clicking on the “Edit” button will allow you to change the default URL WordPress created. If you have a long post title, you’ll want to change the default URL to shorter name, optimally one to four words separated by dashes. When deciding on your post URL name, be mindful of the keywords potential visitors will enter in search engines to find your post. For example, if your post is titled, “Add a Post to your WordPress Website”, by default WordPress will give your post a URL similar to http://www.your-website.com/index.php/2009/01/add-a-post-to-your-wordpress-website. First you’ll want to strip out the frivolous words that aren’t relevant to a keyword search for your article. In our example we’ll drop “a”, “to”, and “your”. We’re left with “add post wordpress website”. All things being equal, this could be an acceptable URL. But I have a bit of extra personal knowledge on the subject of my post and I’ve also done some keyword research to see what my potential audience is searching for. I know the majority of my target readers are WordPress users who aren’t adding the word “website” to their searches for WordPress articles. I also know that every search for WordPress content has the keyword “wordpress” in the search. Therefore, I’m going to place the keyword “wordpress” as the first word in my URL, because the first word is weighted more heavily by most search engines, followed by “add” and post”. The URL I’ve chosen for my post titled “Add a Post to your WordPress Website” is http://www … wordpress-add-post.
After you’re finished with your post title and URL permalink, you can begin to add content to the page in the text editor area below the formatting toolbar. You may either use the standard “Visual” text editor tools to write and format your text, images, and media or the “HTML” editor if you feel more comfortable using HTML code (learn how to [cref insert-image-wordpress-post add an image to your page]).
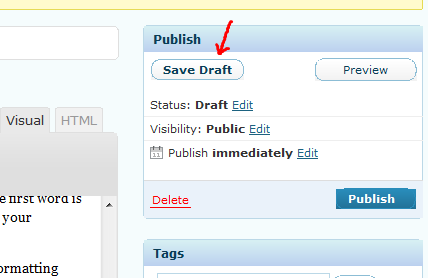
Most WordPress installations are set to automatically save a draft of your work when writing a post, but it is a good idea to manually save your work every so often, especially if you’ve been working on it for an extended period. You’ll find the “Save Draft” button in the publish pane on the right side of the page. This is also important if you want to stop work and pick up again later.
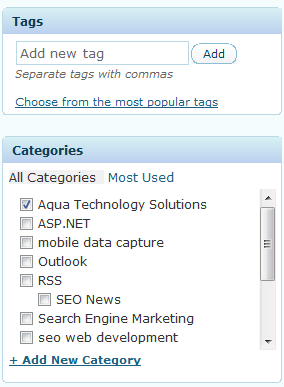
Once you’re finished creating your page, its time to add your post category(s) and tag(s). On the right side of the page in the “Tags” pane, enter the tag names you think best describe your post. You can either use your knowledge of the post topic you’re writing about or perform keyword research to determine the best tags to associate with your post. If you’ve already entered tags for other posts, you can click on the “Choose from the most popular tags” link to bring up a list of your most popular previously used tags.
Adding a category(s) to your post is very similar to adding a tag. You can either create a new category or add an existing one. You may choose to classify your post under one or more categories. If you want to manage your categories, open the category editor by clicking on “Posts” in the left navigation and then “Categories”.
At this point you are just about ready to publish your post to your WordPress blog. In the “Publish” pane above the “Tags” pane, you’ll notice a few options.
Status: This shows whether the post is currently published to your blog, still a draft, or pending review.
Visibility: By clicking on the “edit” link, you’ll see a few options appear. Normally you’ll want to keep the visibility setting on “Public” so all visitors to your website and blog have permission to view your post. However, you occasionally may want to password protect a post. By choosing this option, WordPress will prompt you to create a unique password for your post. The post link will be visible in your blog area, but when a visitor tries to view the page, they will be required to enter your password. This can be a useful feature to quickly protect a post, but for a more comprehensive website wide solution, WordPress plugins exist that present a better option, such as Role Management for WordPress. The final option is “Private”. Making a post private will hide it from appearing in your blog unless you are logged in. A user will also not be able to access it by search or by directly entering the post URL in their browser unless logged in.
Publish: The “Publish” setting directly below “Visibility”, controls when your post will be published to your blog. If you leave this unchanged and click on the publish button, your post will be published immediately which is normally what you’ll choose. There may be instances where you don’t want to publish your post right away, but at some time in the future. By changing the date and time, you can schedule WordPress to automatically publish your post to your blog whenever you want.
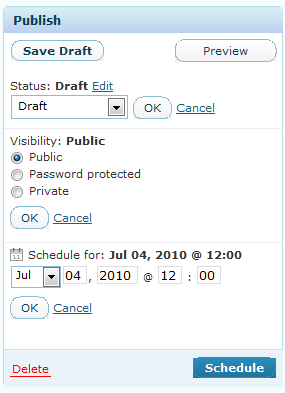
WordPress Publish Pane
Before you publish your post it’s a good idea to see how it will actually appear within your website and blog after it’s published. Click on the “Preview” button in the “Publish” pane to see a preview of your post. After you’ve made any necessary adjustments to your post and you’re ready to make it live in your blog, click on the “Publish” button. If your post or any of your images and test formatting aren’t appearing properly, you can always edit the post as many times as needed and re-publish.

