Do you want to use an email address with the domain name of your website in the address like, my-name@my-website.com? Would you like to use Microsoft Outlook to view and manage your emails? Setting up your email accounts for your website usually involves two main steps, 1) setting up your email accounts with your website hosting company and 2) setting up Outlook to connect to your hosted email account and download the messages to your computer.
The first step is to get your email address(es) setup with your website hosting company. If you’ve already accomplished this please skip ahead to “Configuring Outlook”.
Adding Email Addresses To Your Web Hosting Account
The first step is to log in to your website hosting service account. Unfortunately, each website hosting company has a different interface for managing your account and the procedure you’ll need to follow to get your email up and running can varies widely. If you have trouble navigating your host’s website, the best thing to do is to either call your hosting company and ask for help or use their online help files for direction.
Because GoDaddy is the most popular hosting service today, I’ll provide a quick tutorial on how to set up your email using their website.
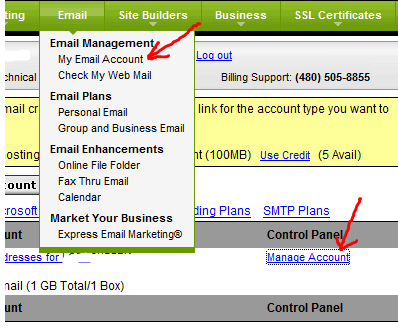
Use your internet browser to navigate to http://www.godaddy.com. Next, log in to the website with either your account number or user name with password. In the top navigation of the site, click on “Email” and then in the drop down choose “My Email Account”. A new sub-window will appear within the page with your email account plan options.
If you don’t already have an active email account, use a credit to create a new account. Don’t worry if this process seems a bit confusing; GoDaddy’s email account setup isn’t very intuitive. One thing to keep in mind is their are two common types of email accounts GoDaddy provides you with a standard hosting account: personal email for a single email address and a 100 email address pack. If you unintentionally choose the single email setup, you can always go back and use another credit to add a 100 pack.
At this point you’ll want to click on “Manage Account” which will take you to your email account control panel.
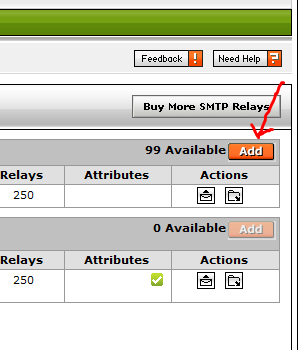
Once in the email control panel, click on the “add” button to create a new email address. Repeat this step for each email address you want to add.
During this process on the individual email account setup screen, you’ll notice a check box that says “Make Catchall Account”. By checking this box, you’ll make that email address the default account that receives all email sent to “any-email-address@your-domain.com”. In other words, any email directed to an email address on your domain that doesn’t have an existing address set up, will get sent to the “Catch All Account”. A Catchall account can be useful because a potential client may mistakingly enter in an invalid email address @your-domain.com thinking you received it when otherwise you wouldn’t have. The downside is, you’ll receive more junk mail because the Catchall email account will receive all email sent to any email address directed toward your domain that isn’t valid. If you’re not receiving a lot of junk mail, it’s a good idea to set the Catchall, but if you find your inbox becoming overwhelmed with spam, then it may be time to turn it off.
Anther setting to note is your mail box size. Some hosts like GoDaddy set the mailbox size default value very low, for example, 10mb. If you’re setting up a large number of email accounts and your host provides limited email account space size, you’ll need to leave yourself enough space to divide up amongst all your email accounts. If you only have a few to setup, you’ll want to increase the size. 50mb to 100mb per account is a good size to be safe.
After you’ve finished adding your new email accounts, log out of GoDaddy and start up Outlook.
Configuring Outlook
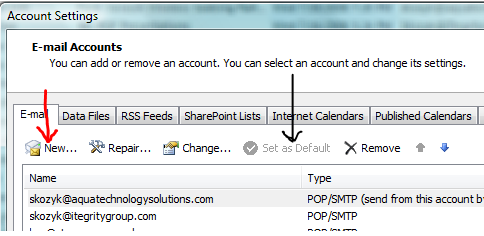
In the main menu at the top of the Outlook screen, go to Tools–>Account Settings. A new window will popup with some options. With the “E-Mail” tab active, click on “new” the icon.
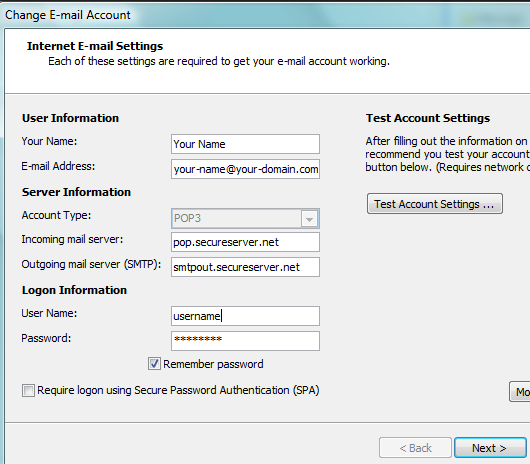
Another new window will appear prompting you to enter information about how Outlook will connect to your hosted email account and how it will appear to others receiving email from you.
User Information: Enter your name or other name as you’d like it to appear when sending email from this account.
E-Mail Address: Enter the email address of the account you are setting up.
Server Information: You’ll need to obtain this information from your website/email hosting company. For GoDaddy at the time of this writing, the account type is POP3, incoming mail server: pop.secureserver.net, Outgoing mail server (SMTP): smtpout.secureserver.net.
Logon Information: The username and password you associated with this account when creating it with your website host. Check the “remember password” box to avoid having to enter your login information everytime Outlook attempts to retrieve your email from your host (by default every 10 minutes!). GoDaddy users should leave the “Require logon using Secure Password Authentication (SPA)” box unchecked.

When you’ve completed the information in this window, chances are you still have a few more settings to make depending on your hosting company’s email server settings, but occasionally this is all you need to do. Click on the “Test Account Settings” button to see if you can successfully send and receive email from your hosts email server through Outlook. If you don’t receive any errors and get a successful test connection, congratulations, you’re technically ready to begin using your email in Outlook. However, you’ll still want to add your information to the “General” page in the “Advanced Settings” area. For the rest of us, including GoDaddy users, there are a few more steps to complete.
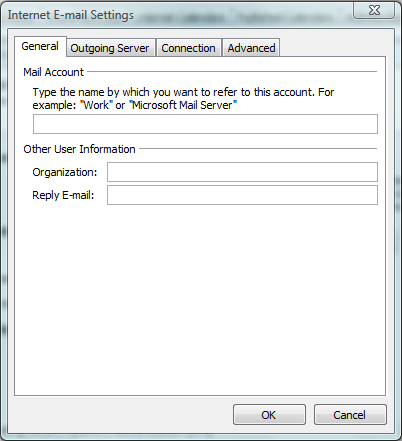
First, let’s finish the “General” settings by clicking on the “More Settings” button. With the “General” tab active, complete the information requested. Once complete, you’ll need to look at the next three tab windows to make sure your settings match the instructions provided by your hosting company. Each company has their email servers setup differently, so you’ll need to know what settings to use to finish your setup in Outlook.
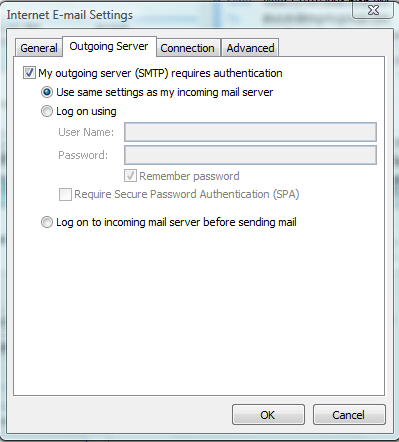
Again, I’ll provide the settings GoDaddy uses which could be the same as your host, but not necessarily. Choose the “Outgoing Server” tab to activate it’s window. Check “My outgoing server (SMTP) requires authentication”. Also if it’s not already ticked, check “Use same settings as my incoming mail server”.
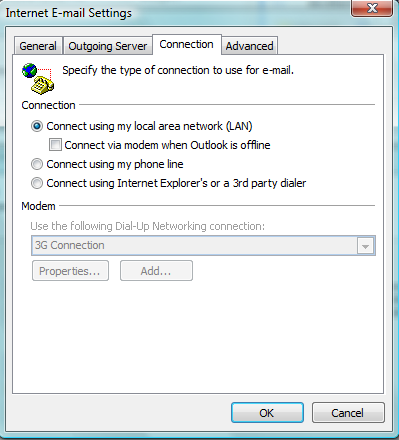
In the “Connection” tab window, you shouldn’t need to change anything. It should already be set to connect using your local area network (LAN). If not, tick the box next to this setting.
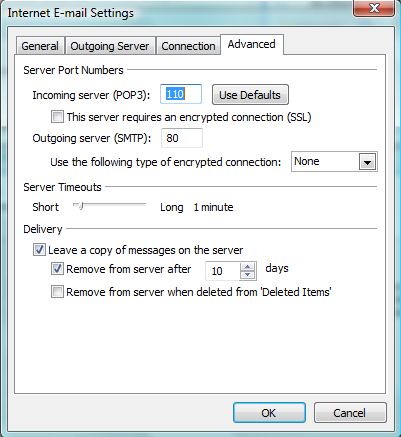
Finally, activate the “Advanced” tab and set the Incoming server (POP3) to “110” and the Outgoing server (SMTP) to “80”. Make sure the “This server requires an encrypted connection (SSL)” box is unchecked.
(For non-GoDaddy users, your best bet here is to use the Outlook default settings of “110” and “25” respectively. If this doesn’t work, you can try changing the Outgoing server (SMTP) from”25″ to “26”. Sometimes the ISPs you’ll be sending email from will block port “25” in an attempt to prevent spam email and your email will inadvertently get blocked).
“Use the following type of encrypted connection” should be set to none.
The “Delivery” section settings are up to you as a matter of preference. This depends on how much space you allocated to your email account with your host. If you set your email account to have a size of 50mb or more, you may want to check the box for “Leave a copy of messages on the server”, then check “Remove from server after “10” days. This will leave a copy of all emails you receive on the email server of your host for 10 days in essence providing you a 10 day backup of all your emails in case something bad happens to your computer or Outlook were to become corrupted.
If you’ve set your email account to have a lower mailbox size limit, you’ll want to uncheck these boxes so you don’t run the risk of having too many emails pile up on your host’s email server before they can be deleted by Outlook. This way you’ll avoid reaching your mailbox size limit and producing the unfortunate event of bouncing all your new incoming emails because you’ve run out of space.
Click on the OK button to accept your settings. Now click on the “Test Account Settings” button again to make sure everything is setup correctly. If you still receive errors, you’ll need to double check all your settings to make sure they are correct according to your hosting company. If you don’t receive any errors, you should now be officially set up in Outlook to begin sending and receiving email.

